My 2015 Sweetwater's playpen cover is in need of repair. It has some, what I call, shredding going on in an area that does not touch the dock or anything else. It is about the size of a dollar bill.
I called the closest dealer, about 100 miles away, and arranged for a new cover. It is covered by warranty. They got the new cover in, however it does not have snaps on it (this would be my responsibility). They also want the old cover back.
I talked to a few canvas repair people and they don't want to tackle the job of putting new snaps on the cover. They say it is too difficult of a job.
Has anyone had to put new snaps on their cover? Is it an"idiot proof" job or is this something I am going to regret starting?
I am to the point now just to get the holes repair and refuse the new cover.
Snap Installation on Playpen Cover
Moderators: Redneck_Randy, badmoonrising, lakerunner
Snap Installation on Playpen Cover
2015 Sweetwater 2086 Coastal Edition - All Toon'd Up
2015 90 HP Yamaha
Mid American Dual Wheel Bunk Trailer
2017 4WD GMC Canyon
2015 90 HP Yamaha
Mid American Dual Wheel Bunk Trailer
2017 4WD GMC Canyon
Re: Snap Installation on Playpen Cover
If this is covered by a warranty. They should be the ones to install the snaps or pay to have them installed. They would need the old one as a guide.
If you have to do it on your own. It is a job that will take a few hours, some blisters, some cussing, followed by a few beers. Or maybe start with the beers and the rest will fall into line.
I have done this before. I replaced the cockpit canvas on our cruiser. As a novice, its not that difficult with the right tools. Just time consuming.
You will need to get some heavy duty tools for the job. The cheap ones will not last more than a few snaps and will be inconsistent. I bought the punch and the snap tool online for a little over 100$. The snap tool is a modified pair of vise grip pliers. They weld the snap tooling on the ends. You have to practice on a spare piece of canvas to set the force needed to crimp the snaps together at the ideal pressure. Once you get the amount of force set in the vise grips it should go pretty quick. I used electrical tape on the adjustment knob to keep the tension consistent. If your canvas is dark in color. Get some white chalk to mark the snap locations. Before you ship the old one back. You can use that one as a guide for the locations.

Re: Snap Installation on Playpen Cover
What I did (not the only way to go, I'm sure):
Buy a pro snap setter. As OCBray said the cheap crimpers are flimsy stamped steel and will fold with the pressure needed to go thru several layers of marine fabric & webbing. The Hoover tool is pricey but it's fantastic. Lots of leverage--no blisters.
Fold the cover in half lengthwise & mark the centerpoint front & rear.
Stretch the cover over the playpen, center it, and use several spring clamps to hold it to the railing.
Mark the exact snap positions on the cover--try to keep the marks centered on the hem and in a straight line.
Now just go along & punch out the hole, squeeze the snap into place, snap it down, then move on to the next. This keeps the cover from shifting & throwing off your snap alignment.
One more thing--don't buy the cheapest snaps you can find. I had no problem with snaps that had a brass rivet attached to the head but I've heard the all-stainless snaps crack the rivet edge when rolling it down during the crimp. Not sure if that's really a problem...
- Attachments
-
- Hoover.jpg (4.53 KiB) Viewed 4186 times
Mark
1996 Sweetwater 180EX + Johnson 40
Rush Lake, Atlanta, MI
1996 Sweetwater 180EX + Johnson 40
Rush Lake, Atlanta, MI
Re: Snap Installation on Playpen Cover
I am literally in the same boat you are. (no pun intended)
The cover on my 2013 Sweetwater 2286 was torn in a windstorm. I was able to have it repaired (temporary) but ordered a new cover direct from Godfrey.
It came with the snaps in a bag...for me to install. My intention is to install them when I take the boat out of the water for the winter. That way I can walk all the way around the boat.
Here is how I intend to do it. (as was stated by others, I'm sure there are other ways, but this is the way I have chosen to tackle the job)
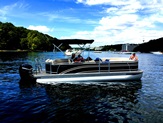
I have already installed the snaps in the areas that I consider "constants." The attached picture is not my boat, but it illustrates where I have installed snaps (white circles). These are the places, "corners" if you will, that can really only be installed in one place. This will be enough to hold the cover in place, with the poles installed loosely, while I mark the other exact snap locations. As I work my way around the boat, I will install snaps in the middle of the long stretches (B), say between snap A and snap C. I will do this on both sides until all the snaps are filled in.
Hope that all makes sense, I hope it works, and I hope it helps.

KPC
The cover on my 2013 Sweetwater 2286 was torn in a windstorm. I was able to have it repaired (temporary) but ordered a new cover direct from Godfrey.
It came with the snaps in a bag...for me to install. My intention is to install them when I take the boat out of the water for the winter. That way I can walk all the way around the boat.
Here is how I intend to do it. (as was stated by others, I'm sure there are other ways, but this is the way I have chosen to tackle the job)
I have already installed the snaps in the areas that I consider "constants." The attached picture is not my boat, but it illustrates where I have installed snaps (white circles). These are the places, "corners" if you will, that can really only be installed in one place. This will be enough to hold the cover in place, with the poles installed loosely, while I mark the other exact snap locations. As I work my way around the boat, I will install snaps in the middle of the long stretches (B), say between snap A and snap C. I will do this on both sides until all the snaps are filled in.
Hope that all makes sense, I hope it works, and I hope it helps.
KPC
- Attachments
-
- snap install.jpg (112.38 KiB) Viewed 4172 times
Re: Snap Installation on Playpen Cover
You guys are a wealth of information and I really appreciate it. I to intend to wait until the end of the season.
Now that it is mentioned, the dealer did say the snaps come with the cover (we'll see). I'll start searching for the tooling to install the snaps. I WON"T buy a cheap tool. I want this one and done.
Appreciate the help and tips.
Now that it is mentioned, the dealer did say the snaps come with the cover (we'll see). I'll start searching for the tooling to install the snaps. I WON"T buy a cheap tool. I want this one and done.
Appreciate the help and tips.
2015 Sweetwater 2086 Coastal Edition - All Toon'd Up
2015 90 HP Yamaha
Mid American Dual Wheel Bunk Trailer
2017 4WD GMC Canyon
2015 90 HP Yamaha
Mid American Dual Wheel Bunk Trailer
2017 4WD GMC Canyon
Re: Snap Installation on Playpen Cover
Ralph.....
1 - I agree that the dealer should be handling this at no charge if it is under warranty.
2 - with that being said, does the canvas shop realize half (the difficult half) of the job is already done? The snaps on the boat are already there and you obviously have the old cover with the snaps in place. Pretty curious why they would not want to make a few bucks.
SOLD - 2009 20' Bentley w/4 Stroke 90hp Mercury
SOLD - 2011 SouthBay 522CR w/115 4 Stroke Mercury
2014 Xcursion 23RF XS package w/150 4 Stroke Mercury
SOLD - 2011 SouthBay 522CR w/115 4 Stroke Mercury
2014 Xcursion 23RF XS package w/150 4 Stroke Mercury
Re: Snap Installation on Playpen Cover
The original dealer I bought this from is a couple of miles from here. However they are no longer a Sweetwater dealer. The dealer I am now working with is about 100 miles away so I guess I'm kind of screwed.
When I talked to the canvas shop nearby I explained in detail the situation that the male half of the snaps are already on the boat. I guess because I'm not buying a new canvas from them they have no interest.
Screwed again.
So I'll probably pull it out of the water next month, earlier than the end of the season, so I have time to work on it properly.
2015 Sweetwater 2086 Coastal Edition - All Toon'd Up
2015 90 HP Yamaha
Mid American Dual Wheel Bunk Trailer
2017 4WD GMC Canyon
2015 90 HP Yamaha
Mid American Dual Wheel Bunk Trailer
2017 4WD GMC Canyon
-
Gonefishing
- Posts: 637
- Joined: Wed Nov 14, 2012 5:56 pm
Re: Snap Installation on Playpen Cover
I did upholstery in the past. It is not hard to put. On new snaps. Just get a good snap tool like the one pictured in the other post. Takes about two minutes per snap.
Bob Jacksonville, Nc
2013 Excursion X23 RFC
2013 115 Yamaha
Pulled with a Ford King Ranch
2013 Excursion X23 RFC
2013 115 Yamaha
Pulled with a Ford King Ranch